Thursday, July 25, 2013

…moving right along and an unexpected new project

Hi there!  It’s been a while since I checked in.  I’m plugging away at project paint the subfloor.  Things are happening, but not too much to show for it just yet.

Nail holes filled.  Hall walls (mostly) painted.  Ran out of paint.  Oops.

Primed and put down the first coat of paint on the hall floors, but no peeking yet, it will take away the fun.  Let’s just say I took a risk in my color choice on the upstairs hall floor and I’m loving it!  That’s one of the perks of a temporary and inexpensive fix, you can go out of the safe zone because it’s only the cost of a can of paint on the line.

In other news, I’ve noticed a lot of peeling paint and a little water damage on the exterior of our house.  You know what that means…the project I didn’t plan on doing is coming my way.  This makes me glad I decided to wait on the hardwoods.  Another reason I chose the painted subfloor fix was because I was hoping to embark on that master bathroom.  But now that I see the exterior screaming at me for some TLC, it looks like the bathroom will wait.

Since I don’t have any pretty pictures of my progress, except for wood putty all over my stairs, I’ll share the direction I hope to take on our exterior.  I’m thinking gray with crisp, white contrasting trim work. 

I love the look of a weathered gray.

cape cod house

Miki Duisterhof {Country Living}

But I also love the contrast of this one.  Not sure if I’m brave enough to go that dark.  
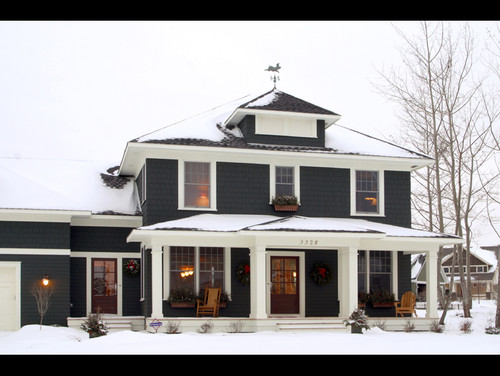
via houzz

On the other hand, I also love a white home with crisp black shutters.  My friend painted her home that way and it’s got me adding white into the decision mix.

It freaks me out to decide because once you do it, there’s kind of no turning back, ya know.  Of course I’ve been pinning away for ideas and inspiration.  If you want to follow along with my decision making process, come take a peek at my board.  Who knows, I might completely change direction and go for neon green tomorrow.  Not really.

I hope to be back in a week with hallway floor pictures.  My sister and brother-in-law and their two kiddos are visiting from Texas so I’ll be taking a break for a bit.  Have a great weekend and week!

…Kim

Monday, July 15, 2013

Fun Find: Wine Stacks

Last week, I was on the verge of a burnout.  So this weekend, I took a step away from the floors and just enjoyed hanging with the fam.  However, my father-in-law jumped on the fun wagon (to save my sanity) and tried his hand at “un-squeaking” our stairs and other fun stuff that goes along with it.  Bless his heart.

Saturday we took a day trip and landed at World Market.  There isn’t one around us, so this day trip was my not-so-secret way to get to World Market too.  Oh, how I wish they would reopen one by us.  Boo.  Anyhow, while we were there, I found these.

IMG_6329

What are they?  Stack Wines.  It’s four individual {BPA free} plastic cups filled with wine zipped up into one package.  How great would these be for the beach, tailgating or a picnic?!  They were too fun to pass up.  Not sure how great they taste, but worth a try.  Had to share this stack of fun with you.  Hope you all had a great weekend!  Did you come upon any fun finds too?

Wednesday, July 10, 2013

the burnout of 2013

BEWARE:  This post contains run on sentences of a crazy stream of consciousness of how one thing leads to another and to another.  Tell me I’m not the only one that starts a project that ends up leading to 500 other projects.

This is the story of how ripping out carpet in the playroom…

…led to ripping out carpet on the stairs…

…which led to ripping out carpet in the hallway…

…which reminded me that I never finished painting the hallway after the burnout of 2009

when it was the year of wallpaper removal.

So now I need to paint the hallway before I can paint the hallway floors, but first I need to make sure all the glue is removed from the wallpaper removal we did 4 years ago.

So now I’m finishing a project from 4 years ago…

…and as I’m washing the walls, I notice how dirty the moldings are, which leads me to washing the moldings, then I see the layers of dust on the panels on the doors, so now I’m washing doors…

…and wait, is that a dried up booger on the wall?  sorry, but that’s what it looks like, no one knows for sure.

So now that I’ve finished washing the walls, it’s time to paint, but I want to paint it a different color than I started painting it 4 years ago, which makes me ponder painting the foyer because this hall connects to the stairwell, which connects to the foyer.

And that foyer color has been bugging me for a while.  But if I change the color of the hallway, then the stairwell, that means I need a special ladder or a special neighbor friend to trim out where the ceiling meets the wall way up there.  Not a simple paint job.

Hmmmm…that original paint color is looking a lot better to me now.

But then, there’s those stairs.  Those stairs.  The sides still have tiny staples, the top half squeaks and we can’t seem to un-squeak them.  There’s still filling, sanding, priming and painting….the other half of the playroom and the hallway all because I ripped out the carpet in the playroom.

And now, I just stand overwhelmed looking at the mess I’ve created.  I am now entering the burnout of 2013.  But no, I can’t let the burnout happen this time.  This time it’s not just walls unpainted, left with glue residue upstairs hiding where no on can see.  This time, we are left with stairs and floors that look like they just built the house and that’s no good. 

And so I will… in the words of the band FUN…

…carry on, carry on!

Monday, July 8, 2013

Painted Floors–How To + Products Used

There comes a point in every DIY that I get completely overwhelmed and antsy.  So much so, that against my better judgment, I skip steps so I can get started already.  These floors for instance. 

Here’s what you should do:

  1. Fill gaps, holes and gouges with wood filler.
  2. Sand.
  3. Clean floors.
  4. Use tack cloth to get rid of dust.
  5. Let dry 24 hours after washing floors.
  6. Prime.  Allow proper dry time (1-2 hours, check your can).
  7. Paint.  Wait 4-6 hours for second coat (check your can).
  8. Sand any rough spots lightly.
  9. Paint.
  10. Wait 72 hrs. for normal activity…shoes, furniture, etc.

Here’s What I did:

  1. Wash floors.
  2. Let dry five hours.
  3. Prime.  Let dry overnight simply because it was time to go to bed.
  4. Paint.  Allow proper dry time (4-6 hrs. for the white, but the gray can said 24 hrs?).
  5. Paint second coat.
  6. Wait. Wait. Wait to put furniture back in…that’s one week before “normal activity”.  Currently, it’s a novelty for the kids to be able to walk in there barefoot or with socks.  No shoes.  Naturally, all they want to do is walk on that floor because I really don’t want them to.

I’m a step skipper for better or worse.  Especially since I know this is temporary.  I tested the subfloors before paint by walking barefoot and deemed the sanding step skippable, hoping the paint would smooth out any sketchy parts.  So far, I’m happy with the results.

I started with Behr’s All-In-One Primer & Sealer and used Behr’s Porch & Patio Floor Paint in Ultra Pure White and Pacific Fog. 

IMG_6314

I did the white paint first and was truly second guessing my plan at that point.  It seemed so stark and I was missing the warmth of the wood.  Thankfully, that all changed after the stripes went down. 

IMG_6285 

Oh, by the way, you MUST use an extender on your paint roller! I was so impatient to start, that I used just the short handle (on my hands and knees - ugh) while priming and it took.for.ever! The next day, I used the extender handle and it took about 15-20 minutes! Oh, and I skipped the paint tray on the white coat too. That’s right, just poured some on the floor and started rolling! Worked like a charm! Don’t pour too much at once though. Just enough to do a little section at a time.  (I used the paint tray for the gray to make sure there wasn’t an accidental overspill onto the white.)

I used Frog Tape’s Delicate Surface tape to ensure my beautiful white floors did not get marred.  Each stripe is 16 inches wide.  We used a chalk line to help guide me as I taped the floors.  You can barely see it, but those faint blue lines are the chalk lines.

IMG_6297

Taping the floors, SO NOT my favorite part. 

IMG_6298

Taking the tape off the floors, THE.BEST.PART!

IMG_6303

More to come on my crazy carpet removal adventure.  This past weekend, I had a date with the second half of my stairs.  It seems the wood is growing carpet pieces because of these nasty little staples.  Going on the top of my least favorite things list right now.

IMG_6316

Friday, July 5, 2013

Sneak Peek: Gray + White Striped Painted Floors

IMG_6303

I am so excited right now, I had to share a sneak peek of the floors!  After all my second guessing, I could not be more pleased with the results.  It was all worth it for sure!  Still need to do some finishing details…caulking, touch ups and painting vent covers.  Then I can move on to the other side of the room.

And I just might have pulled out the carpet in the upstairs hall.  So while this cures, I’ll jump on the upstairs hall.  Be back next week!

Wednesday, July 3, 2013

Monday, July 1, 2013

Can of Worms: Prepping Floors for Paint

#canofworms.  If I had a Twitter account that’s what I’d be writing right about now.  Is that how it even works?  I have no idea how the Twitter world works.  Anyhow, just for fun, my thoughts as I prepped the playroom floors to be painted this Saturday…

What the “H” did I get myself into?

Seriously?

Oh, look, the sprinkles from our gingerbread houses (from Christmas!) stuck in the crevices.  Nice.  Maybe I do need to use wood filler for the cracks.  Seriously, what the heck am I doing?

IMG_6275

Oh, great, look at that splintered wood.

IMG_6277     IMG_6276

Do I really need to fill it?  Why am I doing this again?  Maybe I’ll just put a piece of furniture there.  Will anyone even look anyways?  It is the playroom after all.  This is temporary so why do every little detail?  It will be covered in the future anyways.

Nice gaps between the floor and the molding.

IMG_6290

Great, another detail.  But really, I think we should just wait til we get hardwoods and then get some good chunky baseboards.  Nothing a little caulk couldn’t help, right?

I like the worn in look, so it’s okay if the paint chips.  All the better.  More character.

I just want to paint.  Why can’t I just paint already?  This STINKS!

IMG_6281

Actually, in my head, my word choices were not that nice.  But this is a family place, so I’ll keep it “G” rated.  Excuse the horrible pic, but here’s the before paint pic.

IMG_6278

And a look at the other side of the room.  Most of the carpet is out except where the shelves are and the tv cabinet.  The table and Expedit cubbie shelves were shoved in here until the paint job is done.

IMG_6282

I’ve changed game plans a million times through this process.  At one point, I was going to empty both rooms and do a one and done paint job, but it was stressing me out.  So back to half the room, let it cure, then the other half.

I’m not going to lie, I was completely overwhelmed by the prep work and details and was second guessing the entire thing. But now that I got over the hump (and maybe skipped some of the prep work), I feel it coming together and I’m getting excited.

I did finally get through the primer, two glasses of wine and a coat of paint in my trademark DIY rebel fashion…skipping rules, breaking rules and all that good stuff.  I’ll be back again this week with those pics and hopefully one half of the room done.

Related Posts Plugin for WordPress, Blogger...